Where Do Scanned Documents Go On Windows
When you have a physical document that you want in a digital format you will have to scan that document using a scanner, your phone camera, or an app. But what happens when you scan your document? Where will it go and how can you find your document? This article will go over some of the common places where documents can be after they are scanned. Every computer and phone settings can be different which means this might not work in your particular case.
The location of your files will mainly depend on the method used to scan the document. It depends on the hardware, a scanner, or a phone and it can also depend on the software. For example, if you use the default phone, computer, or scanner software or if you use a specific app to do the scanning.
If you are trying to locate your scanned documents on a Mac or iPhone, click here.
Are you trying to find scanned documents on your Android phone? Check out this article.
Locating files in Windows 10 & 11 - Where are scanned files stored in Windows
Scanned documents are typically saved in the "Documents" or "Pictures" folder on your PC. Specifically, they might be found in
This PC > Documents > Scanned Documents or under your main directory (which most of the time is
C:\
unless changed). For example,
C:\Users\username\Pictures\Scans, this will depend on the default settings of your scanner or scanning software.
Another common location is the "My Documents" or "My Scans" folders, and sometimes the documents might be located in the "Pictures" folder, especially if saved as images.
The Scan app is the default scanner app on Windows 11, allowing you to scan and save documents and pictures to your PC, with an option to save scanned documents in PDF format, which is a feature continuing from Windows 10.
Third-party tools like Google Drive, One Drive, Evernote, or Dropbox can be used to scan and store documents in the cloud, allowing access from anywhere, you could have a setting turned on that automatically stores files inside of the cloud. If that is the case make sure to check your Onedrive or Google Drive folder on your computer or directly in the cloud.
How to find scanned files in Windows
Manually locate scanned documents
You can manually check the location where scanned documents are saved by opening the scanning application that you use and going to its settings. When you are there look for the save location or file path.
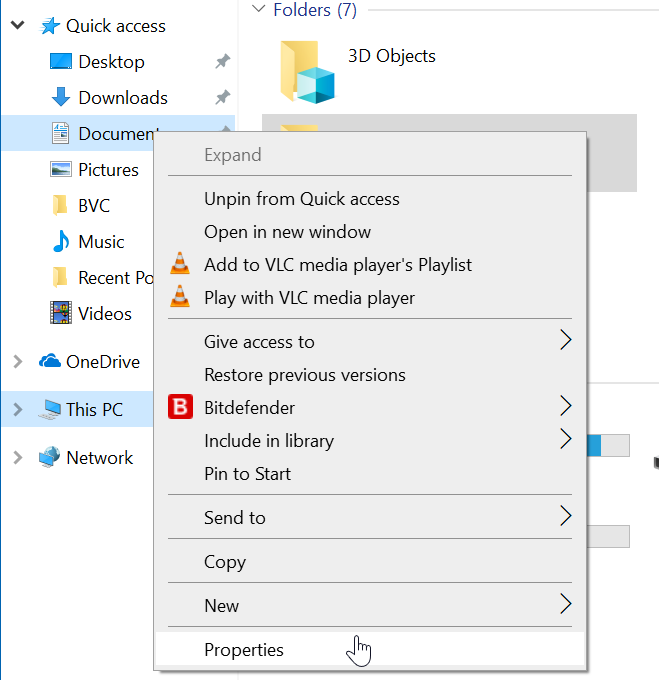
If you've changed the default save location for documents on your PC, the scanned documents might be saved in the new location you specified. You can check or modify this setting by right-clicking on the "Documents" folder, selecting "Properties," switching to the "Location" tab, and viewing or changing the path.
Using File Explorer or Windows Search to find documents
Open up your file explorer and use it to click on the directories mentioned in step 1, or you can use the search bar inside of the file explorer to directly search for the document you are looking for. A quick tip: if you press Windows button + E it will automatically open up your file explorer.
Alternatively, you can use Windows Search to locate the documents from step 1. Click the Start button, now you can directly search for the document name or search for the directory the file is in. While doing this make sure to select the correct category at the top of your search bar like all, documents, or maps (that you can find when clicking on “more”).
Tip Search for Specific File Extensions
If you know what type of document you are looking for, then what you could do is search for PDF or JPEG files. In File Explorer's search box type “.pdf” or “.jpeg”, which are common formats for scanned documents.


